 More Cross-Country Planning
 More Cross-Country Planning
In a basic article, we covered basic planning and navigation for cross-country flight, and in a companion piece, some classic enroute adjustments were described. Now, you've done the work, passed the exam, and your new license says you're a Private Pilot. You can fly your passengers just about anywhere in the world if the weather is good enough.
What do you do when you get there?
Let's review some of the basic planning tools, and expand the list to cover some practical needs that probably weren't included in basic pilot training.
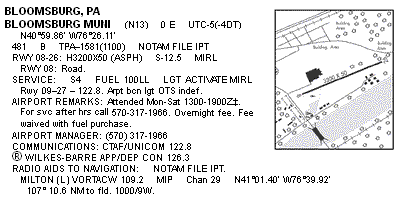
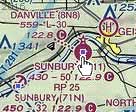 http://vfrmap.com. This is a
useful web site that uses the Google map API. You can examine VFR and IFR
charts, road maps, satellite shots, and so on. Because of a patent troll's
greed, you can't plot courses on it, but there are other applications for
that. Each airport includes a little square "hot spot." Move the cursor
onto it, so the hand
  turns to a
pointer
  .
Then click to display a copy of the
AFD information for that airport, as in the figure above.
There's more to planning than the basic standard weather briefing, although this is still an important step in getting ready for your trip. Here are some useful sources.
 Use the Phone
 In the Internet Age, it seems like a throwback, but the telephone can be your best friend. When you've selected an FBO for a destination, call them for more information. They can help you with services like rental cars and hotels (at a discount), and they often have some perks that don't show up on web sites, like courtesy cars. Many times, these services don't show up on web sites or other advertising. Sometimes, you'll find out that a published taboo can be overlooked – or that there are some unpublished conventions that you need to observe. Make the call. It's worth your time.
Click the thumbnail ↓ to see it pop up full-size
 Besides its availability behind
VFRMAP,
Google Maps is useful in its own
environment. (Bing is similar.) You can
enter FAA or ICAO airport identifiers into the search box. On the Roadmap
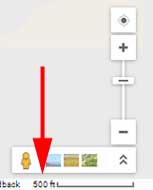
view, zoom in to the "500 foot" scale and have a look around. As you can see
in this example, there's a suitable hotel less than a mile from the transient
tiedown area.
Hover on the icon and some information will pop up. Click it and more
information will show, usually including a phone number or web site.
You'll learn that they provide free pickup and drop-off, so you don't even
have to walk the short distance. Once you're checked in, you have only a
short walk to several eateries and shopping centers. If you ever need a
convenient airport for an overnight stop without wasting much time, this one
is certainly suitable.
At uncontrolled airports, there is usually only one FBO, and its UNICOM frequency is the same as the CTAF. At larger airports, and at all airports with a control tower, this isn't so. 122.95 is a common UNICOM frequency at controlled airports, but many FBOs have a separate frequency. This will be listed in the resources given in the first section here, or you could just call and ask. As a last resort, the ground controller will usually know these frequencies.
Switch to the UNICOM frequency when you're clear of runways and taxiways, in the ramp area. Often, you'll find a helpful person there who will direct you where to park.
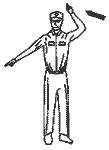
At larger airports, you may be met by a "Follow-Me" vehicle. This might be a pickup truck, or even a golf cart, with distinctive markings and a big sign on the back that says "Follow Me." With or without the truck, there might be a lineman to marshal you into a spot. Look for a brightly-clad person with his arms held high. This is a signal for you to taxi so that you'll and up in a spot facing that person. As you get closer, the marshal will use hand signals to help you make fine adjustments to your position. There are several of these in §4-3-25 of the AIM, but you will usually see only three basic signals:
 |
 |
 |
| Come straight ahead | Turn that way | Stop |
Show the lineman your keys when you shut down, so he knows the magnetos are off. He will probably be putting chocks on at least one of your wheels, and it reassures him to know that the prop isn't likely to start turning while he's near it.
 Unless you're from New Jersey or Oregon, you're probably used to pumping
your own gas into the car. You can service your own airplane, too, even in
those two states. Your instructor should have shown you the drill, but many
leave it out of the syllabus because it's not on the flight test. Here's how
to do it.
Now it's time to move back into the non-flying world. If it's just a lunch run, your job is to get to the restaurant. If that's in the terminal, you're all set. If it's somewhere else, the logistics aren't too different from any other business you might have on the ground.
If you're expecting a rental car, you might have arranged it with that pre-flight call to the FBO. If so, the desk rep will hand you the keys, you'll sign the papers, and off you go. If you have to deal with an agent, it's not much more complicated. Next stop is your hotel or the restaurant, depending on your mission. Maybe you'll do a bit of touring first.
For short stops, many FBOs can supply a courtesy car, also called a crew car. This could be anything from Tom Joad's jalopy to a brand-new luxury sedan. Often it's a retired Crown Vic that the local sheriff no longer needs. These free loaners usually come with a time limit, and there's always room for you to add some gasoline before you return the car. It's a relatively new (2014) application, but you can find a growing directory of courtesy cars at this site.
If you're just pausing for a rest, you might not even leave the FBO. Many have pilot lounges and snooze rooms. Sleeping facilities run the gamut. You could end up in a reclining chair, a secluded cot, or even a complete bunkhouse. Again, that pre-flight phone call helped you get set up.
This topic is worthy of an article all by itself. Here are three:
Some airports will let you set up camp next to your tiedown or nearby. Some will let you crash on the FBO couch. Others are adjacent or very close to a traditional roadside campground. You'll have to do a bit of research to see if any of these options are available to you. Crawling Google maps as described earlier might be productive. AOPA's airport directory includes notations if the airport allows camping on field, but this information may be dated – it's a good idea to call for confirmation.
There is also some information at the Back Country Pilot and Shortfield web sites. As the names imply, these sites tend to be oriented more toward the more isolated strips, especially those in the Rocky Mountains.
A related topic is survival, which is beyond the scope of this article. Doug Ritter's survival site is a good place to start.
Back before the Dawn of Time, pilots got from Point A to Point B without GPS. They used gadgets like VOR, ADF, or even just a pencil line on the chart. These pilots taxied to the runway, completed a few checklist items, and launched toward the first waypoint. After that, they found their waypoints one by one, until it was time to find an airport and land.
With modern equipment, we have the facility to enter en entire flight plan before taking the runway. This could mean keying in ten, twenty or even more waypoints, so that navigation is all set from takeoff to touchdown. For many pilots, this can take several minutes, and while we're doing this, out passengers are sweating in our little cockpits, wondering if they'll ever get to that cooler air at seven thousand feet.
This is a terrible way to convince your family of the benefits of General Aviation.
If it's an IFR trip, the same pilots complain bitterly about re-routes, because they then have to undo all that careful programming and start over. If this might happen to you, it's a waste of time to program the whole route.
Just program in your first one or two waypoints, and let it go at that. Like
the dinosaur who groped along one VOR at a time, you'll have plenty of time
before running off the end of your GPS flight plan. And you'll be looking
for something to do after you level off in cruise. Why not use that time to
complete the flight plan? You get underway quicker, and your passengers will
be impressed with your piloting
 Every pilot learns how to visualize the traffic pattern on the heading
indicator. The same technique can be used to find the 45° entry to
downwind at an airport, long before that airport is in sight. This trick has
always been available at airports with on-field VORs, but those are in the
minority. Now that GPS is commonplace, the trick should be more widely
known. Suppose you're approaching an airport with a Runway 9, but you
don't see the runway yet. You'd like to enter "on the 45" because it's
convenient from where your approach begins. This means that you should aim at
the center of the airport on a course of 225°. Easy. Just set your GPS
to OBS mode and select a course of 225.
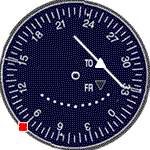 That would be great, except for the
math involved. You need to add (or subtract, for right traffic) 135° to
the runway heading, modulo 360° – while navigating and keeping
the airplane upright.
But take a look at the OBS for this setup. The runway number
is in the "bottom left" corner for left traffic. If it's right traffic, just
dial the runway number to the "bottom right" corner and you're all set. In
the example illustrated here, if you fly heading 270 you'll eventually join
that 45° line. It doesn't get much easier than that, and all you need to
do is use your GPS's OBS mode.
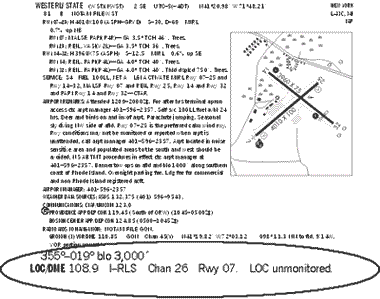 The Chart Supplement includes useful information that is not always taught to
the private pilot. At the very end of the airport information we find
radio aids to navigation. This is where we
have learned to find VORs that will help us find the airport, once we're
close. This section also lists instrument landing aids that are specific to
one airport.
An ILS localizer is like a VOR with only one radial. For this airport, the signal guides the pilot along the centerline of Runway 7. Another way to look at this, is that the signal could be used to find the entire airport, if you're approaching from the South, Southwest, or West. Just dial it in, fly until the needle centers somewhere on the extended runway centerline, and track a course of 070° until you see the airport. You don't have to land on that runway, just find the airport and enter a landing pattern.
Another useful function, for some of these signals, is that they include DME. Anything you can do with DME at a VOR or VORTAC, you can do with DME on a localizer. Tune your DME to the frequency shown, and you'll have a continuous readout of distance to your destination airport. While we're on the subject, there are a few airports (present or former military bases) that have pure TACAN, which also has a DME signal. In the radio aids ... section, look for an entry like
Note the equivalent frequency, FOK (111.0). Tune your DME to 111.0, and you know how far you are from the station. Since this one is "at fld," that's your distance from the airport.
Note:
Neither of these facilities are shown on the sectional chart. You must find
them in the Chart Supplement. They also show up on AirNav and other
online sources, but you have to look a bit harder to find them there. Use
the Chart Supplement.
VFR over-the-top operations are the subject of many arguments. Why would a pilot want to fly where she can't see the ground? If the engine quits, what are the options? Let's assume that the engine won't quit, just as we do when flying
… you get the idea. With a healthy attitude about mitigation, many pilots feel that over-the-top operations are worth the risk. But it's nice to know where the tops are.
 In a standard weather briefing, the tops forecast is given only in the Area
Forecast (FA). This is useful, but the forecast areas are large, and the
FA is scheduled for elimination. We can get finer granularity from the
skew-T Log(P) charts, a NOAA product that looks much more difficult than it
really is.
 Twice a day, the Weather Service releases balloons at
dozens of locations
around the country. At several altitudes, these balloons measure temperature,
dewpoint, and wind velocity. The data are used to prepare forecasts for these
parameters, which we can inspect at NOAA's
Soundings Update / Forecast web site. The most useful
forecasts are the first two options, Op40 and Bak40. Lower
down in the menu, select the time slot and station(s) of interest, and click the
button for "Interactive plot." The station doesn't need to be one of the
places where the balloons are released; you can choose just about any place
that has METAR. The default plot is still too complicated. On the display
page, click the button for Simple Plot, and you'll be treated to a display
like the one you see by clicking the thumbnail at left. The axes are
… hence the name Skew-T Log(P). The colored lines are
forecasts for temperature (red line) and dewpoint (blue line). Where they
meet, you can expect clouds. Where they're at least
5°F apart, you should be in the clear. If you were flying under IFR,
you'd compare the temperature line to the slanted 0°C freezing level to
get an idea about icing.

When you run the mouse over the NOAA-site plot, the display is annotated with the altitude corresponding to local pressure, and with the temperatures for the sample point. In this example, we see that the temperature and dewpoint are well separated at 6312 feet, and for any higher altitude that we're likely to use. That is, we'd expect the cloud tops to be around 6000 feet. (Indeed they were. Here's the view from 10,000 feet for the time and place corresponding to this graph.)
If you'd like to dig deeper into this topic, here's a longer article about the Skew-T.
Flying in Canada is not very different from flying in the United States, but the rules and customs aren't completely identical. Some of the differences are explained in this article, which even includes a few tourist links.
You've probably read several flight training texts by now. Here are some stories about pilots' adventures that tested their training and luck. The first two are about the exploits of freshly minted pilots who do their cross-country trekking all the way across the country.