 Landing the Four-Place Grumman
 Landing the Four-Place Grumman
What‽ Another article about landing an airplane?
There must be hundreds or thousands of these articles, so let's start by pointing out some of the best ones:
The article is intended for beginners, so some of the statements about aerodynamics are not completely "pure." But they are accurate enough to get the point across without being unnecessarily complicated.
To make a good landing, you should start by flying across the runway threshold at the right height and airspeed. We're going to compromise the "right" height a bit, but it's generally agreed that the "right" airspeed is about 30% faster than the speed of a 1-G stall, with the airplane fully configured to land. That speed is 68 knots in the Tiger and Cheetah, slightly less in the Traveler. For convenience, let's round up to 70 knots. Here's how to get there.
The approach really starts on the downwind leg, 1000 feet above the runway and about ¾ mile from its centerline. By the time you're here, all landing checklist items should be done except for final flaps. From this position, the runway will look like it's inside the wingtip, somewhere in the outer one of the three wing panels. Use 15° flaps and fly 80 knots. This will require 1900-2000 RPM. To get the flap setting right, hold the switch in the down position for about three seconds – if the motor is running at the right speed, it takes about ten seconds to lower the flaps completely.
From this point to landing, if you're lucky and it's a calm day, you only need to make two changes, indicated in red on the figure below. The dimensions are calculated for a 4-degree glide path, which will produce about 500 foot per minute descent at 80 knots. This is comfortable for all but the most sensitive passengers. The turn radii are calculated for 20° bank angles.
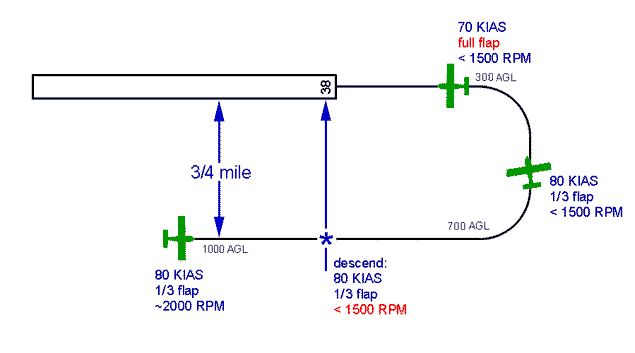
Pick an aiming point on the runway, usually the numbers. If the runway isn't painted, pick a point just beyond the threshold. When you pass abeam this point, reduce power to less than 1500 RPM and start your descent. The pitch attitude should be about 4° lower than it was for level flight – what you've come to recognize as a normal descent attitude. When you've lost almost 300 feet, turn to the base leg. If there's any wind at all, remember that this turn will be more than 90° Your inside wingtip should never point toward the runway on the base leg. If it does, either you forgot how to fly a rectangular pattern or you're setting up for a downwind landing.
It's time for a short digression. Many pilots are taught to stay on the downwind leg until the aiming point is 45° back, "because the pattern should be square." If you consider that airplanes can't turn perfectly square corners, you'll realize this is impossible. The pattern above is "square" – the base leg is the same distance from the threshold as the downwind leg is from the runway centerline. At the point where the pilot starts turning to base, the aim point is about his 8:00 position, not 7:30 (45°). This is a very subtle difference. But if you find yourself using a lot of power on final, it might be that you're waiting too long to turn base.
Once you're on base, make no changes. Just fly the base leg. Same power and flap settings, same pitch attitude. Many pilots monkey with flaps and power on the base leg, especially in airplanes whose flaps have "notches." This is completely unnecessary in the 4-seat Grummans. Just fly the base leg.
Many pilots don't give the base leg the respect it deserves. Among other things, this is your wind check! The landing pattern is the reason for all those other ground reference maneuvers, especially the rectangular pattern. The base leg should be square to the runway centerline. If there's any wind at all, the nose will be pointed slightly toward the runway to control drift. If you need a big crab angle to fly square, there's a lot of wind. You may need to add a bit of power to keep your glide path stabilized. If you add a small amount of power early, you won't have to use full throttle later.
Plan your turn to final so that you roll out on the runway centerline. Then make the second adjustment. Without changing power or pitch attitude, add the rest of the flaps. By the time you're lost 100 feet, the airspeed will stabilize at 70 knots; trim for it. Keep aiming for the aim point. About two seconds before you get there, you'll start to use the energy in that 30% margin over stall speed. First, we need to dive into some technicalities. If you'd rather skip that part, the next mechanical step is here.
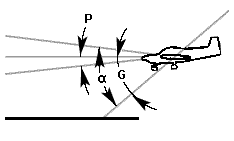 For many years, the FAA has recognized that the best and safest landings are
preceded by a
stabilized approach,
where the pilot "establishes
and maintains a constant angle glidepath toward a predetermined point on the
landing runway," which we call the aiming point.
That's the glide angle G in the figure at right.
We try to do this at a constant angle of attack (α), selected
for an acceptable margin before a stall. Most of our planes don't have an
instrument to measure α, so we strive for a constant airspeed,
which is generally equivalent.
If α and glide path are constant,
then it's not hard to see that pitch attitude (P) must also be constant
– it's just the
difference between the other two
angles. So
on a calm day, the approach described above will have you trying to find the
pitch attitude and power setting that will let you fly a 4° glide path at
70 knots (80, before the final flap setting).
There is an old argument about control inputs that probably started when engines were first added to aircraft. In the flight regime you use for a landing approach, you will find it best to control airspeed by recognizing that it's related to angle of attack – use the elevator. If you're a bit below your desired glide path, add some power and catch up to it. Less power if the airplane is ahead of the glide path. The next figure tries to illustrate this.
We perceive that the glide angle is much steeper than it really is. Although it looks like the airplane is descending steeply, the 4° glide path is really almost horizontal. When you get a bit low on the approach, you could think of adding power as pushing the airplane forward to the correct glide path. That's easier than trying to visualize thrust as an up/down control.

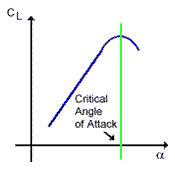 The lift that the wing produces depends on air density (ρ), true
airspeed (v), wing area (S), and the lift coefficient (CL):
Now, in unaccelerated flight, the vertical component of lift must be equal to the weight of the airplane. So Eq. 2 leads directly to
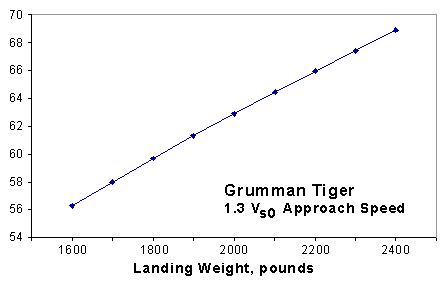
That relation is graphed below for the Tiger; curves for the Cheetah and Traveler are very similar. If you really want to finesse your landing, adjust your final approach speed if the airplane is not at maximum gross weight.
As you can see, the curve is nearly a straight line in the weight range where
these planes are operated, so here's a useful approximation
for the 4-seat Grummans:
Reduce your final approach speed by one knot for each 60-100 pounds below
MGW. If you took off at MGW, you will get a similar result if you reduce
one knot for each hour flown.
If you fly at a big enough airport, your runway may have a VASI, PAPI, or other Visual Glide Slope Indicator (VGSI). You will notice that this approach is almost completely in the region indicated as "above glide path." That's OK, and here's the reason.
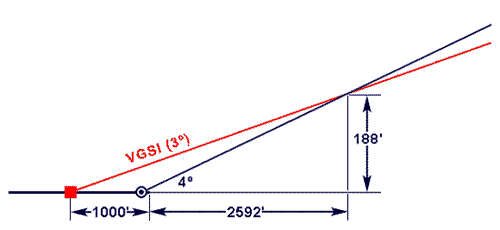
The approach described here is 4°, ending near the runway threshold. A typical VGSI leads to a point 1000 feet from the threshold, with a 3° glide path. For most of the approach, our visual approach will always be above the VSGI; as the figure shows, they cross inside a half-mile final, about 200 feet up.
So far, you've worked diligently to set up a 4-degree approach to an aiming point near the beginning of the runway. If the approach is perfect and you don't do anything else, that's where you will crash. Rather than do that, let's use the extra energy we saved by approaching somewhat faster than stall speed. About two seconds before impact, shift your focus to the horizon, reduce power to idle, and fly level over the runway, a few inches higher than you'll end up when all the wheels are on the ground. Idle power isn't enough to keep flying at the present airspeed, so you flare gradually to almost a stalled attitude. Here's a detailed description.

From the time you make the transition from approach (airplane #1) through flare to fully landed (#5), note that you will be continuously pulling the elevator farther and farther back. This begins when you round out to level flight (#2). In a previous section, we found the relation
At position #2, the airplane is pointed at the horizon, several inches above the runway. As the airplane slows and you increase the angle of attack, the airplane rotates about its center of mass. This moves the main wheels closer to the ground in a tricycle-gear airplane (#3). Eventually, the nose will be high enough that the main wheels roll onto the ground (#4). In an ideal world, this will happen just barely before the angle of attack is large enough to stall the wing.
Now consider another effect of having the center of mass ahead of the main wheels. As soon as the main wheels are down, there is a strong tendency for the nose to let down. Keep adding up-elevator to maintain touchdown attitude (#4), until the speed has bled off to where the nose just won't stay up any longer. At this point, the elevator will be completely back and you will barely feel it as the nosewheel comes gently to the ground. You will probably need to add a bit of power to taxi clear of the runway.
This has been a rather long description of how to land an airplane, so let's return to one of the earliest statements:
To make a good landing, start by flying across the threshold at the right height and airspeed.
All of the techniques – airspeeds, flap settings, etc. – from pattern entry to short final are designed with that simple goal in mind. Do that consistently, and you'll consistently make good landings. Don't stop flying when the main wheels touch. Keep pulling that yoke until there's not enough energy left to keep the nose wheel off the ground.
 When the Engine Quits
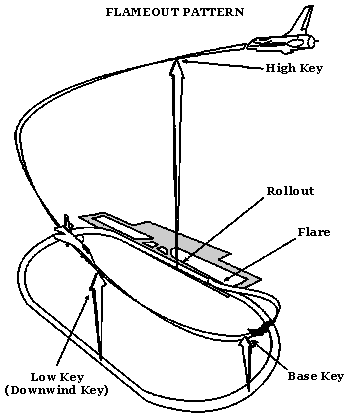
If an F-16 loses its only engine near a runway, the pilot uses a well-practiced power-off landing pattern that emphasizes "key points." The terminology is useful in our Grumman patterns as well. This figure (right) shows how the jets do it. They are trying to fly through three specific points at precise heights:
We should do the same in the Grummans. An emergency is no time to start trying to invent procedures, but many pilots do unusual and interesting things when faced with a power-off approach. One reason we learn the landing pattern is that it works, and its principles work whether the engine is making power or not.
The figure below is from a 75-year-old training manual, but it still shows
the best forced-landing strategy. After you've selected a landing site,
fly to the downwind key if you can, and take it from there. If you have
plenty of altitude, circle over the landing site until you're about 1500
feet above ground. Then fly to the downwind key.

With the general-case diagrams in mind, the following figure shows a calm-day power-off approach for the 4-place Grumman. Its scale is identical to the first figure in this article, so it can be overlaid on the image of the normal landing approach, which is shown here in light grey. It has been calculated for the Grumman's best-glide speed (72 knots), the power-off glide ratio 10:1, and using 45° banks in the turns.
The bank angle is considerably steeper than for a normal pattern, because the pilot needs more time to analyze the ground track on the straight parts The base leg is especially important, because it is here that the pilot gets an idea what to change, if anything: too high or low, how the wind is changing closer to the ground, and so on.

As in the normal approach, the downwind key is abeam the aim point, about ¾ mile away and 1000 feet up. Choose an aiming point about 1/3 along the landing site, for a little insurance against an undershoot or downdraft. As you get closer to landing, you may be able to move the aim point toward the beginning of the landing site. But wait until your landing is assured.
If you have to hit the trees, you're much better off at the far end of the landing site than the near end. Before you can get out of the airplane, you have to stop it, meaning that you have to dissipate its kinetic energy. That energy tracks the square of speed.
The math is beyond the scope of this article, but we can put some numbers on this. If you decelerate to a stop in one foot, a 20-knot crash is equivalent to 17.8 times the force of gravity (18 G). 70 knots, 218 G. Race driver Kenny Bräck's accelerometer recorded 214 G in a 2003 crash (video at the link). He surprised medical experts by surviving, and took 18 months to recover from his injuries.
At the downwind key, it should look like the landing site is on an angle that puts it just inside the wingtip, same as a normal approach. The angular relationship is important. If you're a bit high, you'll also be a bit farther away, which will help you lose the extra height. If you're too low, you'll also be a bit closer in.
At the base key, make a decision about your glide angle. If it looks like you're low, you would turn directly for the aim point, or plan to land along the near side of the landing site if it's wide enough. Too high? Fly through the centerline and then turn back to final, slow down (don't stall), slip, add flaps, whatever you think will work best.
Remember that you can slip or stop slipping almost immediately, but adding and retracting flaps depends on the speed of the flap motor. Also, if the flap motor fails, you are committed to whatever position the flaps are in.
Before landing, unlatch the canopy and secure the engine (mixture and magnetos off, remember to switch the fuel OFF).
This is what the law says.
It does not say that you must be able to land on a runway. If it did, cross-country flying would be impossible.
This pattern is for a forced landing without power ‐ an emergency. Although there are some similarities to the normal pattern, there are also significant differences. One of them is that the normal pattern doesn't permit the plane to glide to the runway without power. To many pilots, that thought is heresy. The method given here acknowledges that the plane is beyond power-off gliding distance from the runway, beginning about the point where the pilot turns base. This is one reason for starting the descent before this point. If anything untoward happens at the power reduction for descent in the landing pattern, the pilot is still in a place where the runway is "made." If things are OK, he can proceed with a normal, stabilized descent.
A hundred years ago, engine failures were common, and pilot training
emphasized pure power-off approaches to a landing. In other words, every
landing was made from an approach like the forced-landing
approach. Engines are more reliable now, and the FAA emphasizes a
stabilized approach made with power. That is the basis of our
normal landing approach, and is intrinsic to
glide path aids such as VASI, PAPI, and electronic glideslopes.
Many pilots follow the dogma that the plane should be within power-off
gliding distance to the runway from any point in the landing pattern. For
the forced-landing pattern, that's obviously true.
anon., Air Traffic Control (JO 7110.65V), FAA, US Dept. of Transportation, Washington, 2014.
anon., Airplane Flying Handbook (FAA-H-8083-3), FAA, US Dept. of Transportation, Washington, 1999.
anon., Civil Pilot Training Manual, CAA, US Dept. of Commerce, Washington, 1941.
anon., On Landings (FAA-P-8740-48), FAA, US Dept. of Transportation, Washington, 1995.
anon., Owner's Manual, Model AA-5 and Traveler, Grumman American Aviation Corp., Cleveland, Ohio, 1975.
anon., Pilot's Operating Handbook, Model AA-5A Cheetah, Gulfstream Aerospace Corp., Savannah, Ga., 1979.
anon., Pilot's Operating Handbook, Model AA-5B Tiger, Gulfstream Aerospace Corp., Savannah, Ga., 1979.
Denker, John S., See How It Flies, av8n.com.
Hurt, H.H., Jr., Aerodynamics for Naval Aviators, US Navy, 1960.