from Camera
-73.123600

-73.123439

-73.124496

-73.125423

-73.128290

South antenna
-73.164002
North antenna
-73.164659

-73.209440

-73.184041
It became immediately obvious in the project of photographing an analemma at the location I chose, that a lot of number crunching would be needed. Ths location I chose for the camera was in a sensitive area of a public-use airport. This meant that I could neither leave a camera on-site for an entire year, nor erect a fixture that would let me place the camera in the same exact location for every shot. So it was imperative to find a defendable way to take sun-shots and superimpose them accurately onto a carefully documented background scene.
In the original analemma photo, Dennis diCicco solved the problem of year-long registration by mounting the camera in his house. This gave him complete control of everything but the scene in the background of the astronomical event. Frank Zullo dealt with it in Arizona by shooting the Sun from his house and superimposing the analemma onto a beautiful background scene that he shot from a nearby, but different, location. Pál Váradi Nagy dealt with the problem by excruciating mathematical exorcism that would soon become intimately familiar to me.
Building the background scene, a 150-degree panorama, turned out to be the easy part of the operation. All I had to do was find a suitably scenic morning, go take a few dozen photographs, and stitch them together accurately. It's been done a thousand times before. But how could I be sure that that I could put the sun shots in the proper location against that background? Answering that question led me to confront several others:
What follows will cure just about anyone's insomnia, but it explains how I'm sure that my analemma image shows exactly where you'd see the Sun if you stood on the camera spot for a whole year, and blinked twenty-four times.
Testing the horizontal calibration is easy. Re-stating one of the pixel-mapping equations,
which was developed in the main article:
There are eight landmarks in the scene whose exact location is known, thanks to the functionality of Google Maps. The bearing of each (φ) is a straightforward calculation, as described in the companion article How Long Is Your Lens?
| Site | Coordinates | Bearing
from Camera |
Pixel* | |
| Camera | 41.166369 -73.123600 |
— | — | |
 |
Church spire | 41.155080 -73.123439 |
179.38 | 1950 1838 |
 |
VOR | 41.160724 -73.124496 |
186.81 | 2396 2309 |
 |
Wind Sock | 41.163297 -73.125423 |
204.07 | 3465 3405 |
 |
Control Tower | 41.163489 -73.128290 |
230.79 | 5171 5100 |
 |
WICC South antenna |
41.159218 -73.164002 |
256.76 | 6693 6749 |
 |
WICC North antenna |
41.161005 -73.164659 |
260.15 | 6908 6964 |
 |
RESCO stack | 41.162481 -73.209440 |
266.53 | 7290 7369 |
 |
Candy Stack | 41.170680 -73.184041 |
275.39 | 7832 7911 |
* !! first numbers: dumpster4; second numbers: dumpster5
The panorama was carefully assembled to conform to Eq. 1 for a focal length of 20 mm, so it's no surprise that agreement is quite good. The size of the component panes was adjusted so that Eq. 1 would be satisfied. That provides the confidence needed to properly superimpose the Sun images to form the analemma – at least in azimuth.
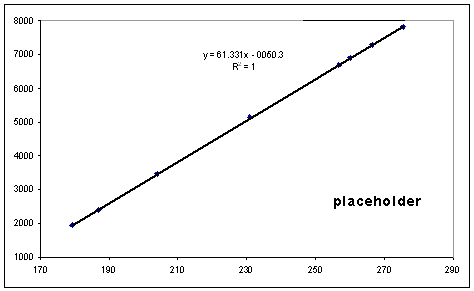
!! comment about linearity and accuracy of slope
The range between the control tower and the Candy Stack got special attention. This area needs the best accuracy because that's where the Sun images were superimposed on the backgrund scene.

!! more comment about linearity and accuracy of slope
Calibrating the vertical axis is more tedious because of the trigonometry involved. We're projecting the celestial sphere onto a plane. The figure uses the projection paradigm (upright image) instead of the one for thin lenses (inverted image) because it's a bit easier to see what's going on. The math is the same either way. We're interested in the distance on the sensor between the images of the Sun and the horizon, to be compared to the results predicted by the vertical projection equation
which was also developed in the main article:
The exact ratio f / δ is used here because we will be concerned with the exact focal length of the lens.
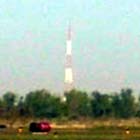
To test the accuracy of the equation, I took a series of pictures of the Sun at known times, and compared them to the elevation obtained from NOAA's Solar Position Calculator. The pictures look like this example, which has been cropped to remove a lot of image below the horizon. Ideally, the horizon would be in the center of the test image, but that's not always easy to arrance precisely. So we do a bit of math to get around that. However, it is important for the horizon to be level in the test shot. It's possible to correct that too, but it's much simpler to just hold the camera level.
Ideally, the camera should be level, with the horizon centered vertically. This is the assumption in Eq. 2, and it's the formula that was used to construct the analemma photo. This means that half of the camera frame is filled with stuff below the horizon, which is basically wasted information for our purpose. Here's the geometry for a scene where the camera was looking up a bit to get the Sun and the horizon in the same picture.
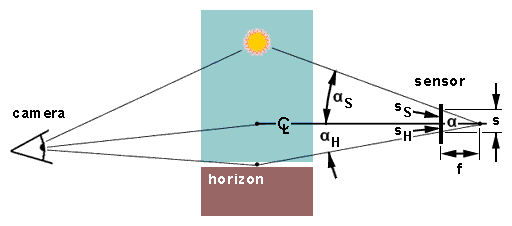
The right side of the figure is adjusted to show how things are seen from the viewpoint of the sensor. Its "horizon" is always the at center of the picture. Here the natural horizon is below center by some angle αH, and the Sun is αS above centerline. Because the lens is focussed at infinity (our subject is 93 million miles away), the sensor's distance from the lens is f. The offset angles for the Sun and the horizon therefore satisfy
The Sun's elevation is the sum of the two angles.
where nS and nH are the number of pixels between the center of the frame and the Sun and horizon, respectively. If the calculated value of α matches the Sun's elevation obtained from the Solar Position Calculator, the calibration is good.
The focal length of the lens is an important parameter here. With an affordable zoom lens, the only positions you can repeat reliably are the extremes. In my case, that means 18mm, which is the nominal focal length for all of these calibration shots. The actual focal length of the lens at this stop is slightly different, even though the EXIF metadata says 18.0mm. So there's a calibration shot for that too. This crop is from the center of a test shot where the horizon was placed as close to the center as care would allow, to minimize the effects of the lens's known distortion at that end of its zoom range. If you click it to pop up the full-sized version, you can count the pixels yourself. The angle these two markers subtend at the camera location is known very accurately, so I used the method discussed in How Long Is Your Lens? to calculate the actual focal length, 18.4 mm.
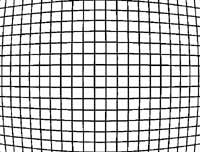 Also because of the barrel distortion at 18mm, it's important to locate the
Sun as close as possible to the center of the test image. It was a while
before I realized just how important this was – not just for measuring
the Sun's elevation, but also to minimize the error if I didn't get the
horizon 0.00° level.
Barrel distortion puts each pixel closer to the center of the image than it
should be. Measurements with this lens have been corrected for its known
distortion,
which is significant: -3.5%.
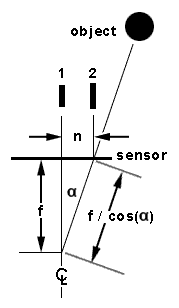 There is a small, but measurable effect on magnification for any part of the
image that is off-center. This is not a lens aberration; it's an unavoidable
effect of perspective. For distant objects on centerline, the magnification
is approximately
For an object that's n pixels off-center, the offset angle is
Combining Eqs. b and c, and skipping a few intermediate steps that require trigonometry and the Pythagorean Theorem,
In the calibration photos used here, this error should be applied to the
height of the Sun as measured above the center of the frame. As it turns
out, the easiest way to deal with it is really to make it negligible;
that is, to make

 You can't just take a picture of the Sun, and see things on the horizon at
the same time. The
sensor doesn't have enough dynamic range for that. But I was able to find an
exposure that allowed me to locate the center of the Sun with reasonable
accuracy, while still keeping enough detail to locate the horizon.
That was to meter for the scene while ignoring the Sun, and then add a 64X
neutral density filter. This is an acceptable compromise at both ends. The
Sun is blown out, but not so badly as to keep me from estimating its center.
The horizon is deep in shade, but can be brought up in Photoshop well enough
to measure where it is.
The little photo on the left shows about how it started. A lot of darkness
and an overexposed Sun. But if you click the thumbnail on the right, you'll
see that there's enough detail in the shadow to find the horizon.
Now, we just need to deal with that blown-out Sun.

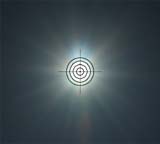 Zooming in on the Sun, we can set a threshold at the highest brightness
level, and center a target there. After the threshold mask is removed, the
target still locates the center of the Sun quite accurately.
The center pixel value (camera axis) is just half the height of the image. Together with the values for the Sun and horizon, we now have enough information to find nS and nH in Eq. 3.
For this particular photo, Eq. 3 yields a measured solar elevation of 29.3°, in almost perfect agreement with the Solar Position Calculator's prediction (29.4°). The method used to locate the Sun makes it doubtful that this is off by more than one pixel, leaving the horizon as a possible source of error. Even if the horizon is mis-located by ten pixels (unlikely), Eq. 3 yields values between 29.2° and 29.5°.
It isn't necessary to wait a whole year to find out if the calibration is
good, just long enough to take as many pictures as needed to catch the Sun
in the appropriate range of elevation.
!! <better explanation>
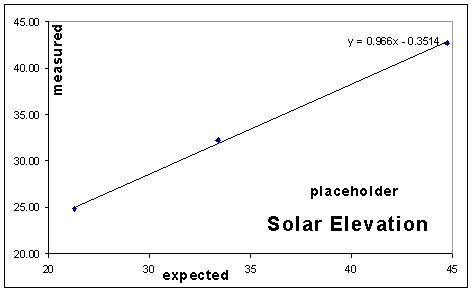
I did that, and the next figure shows
that the agreement was satisfactory:
